

I’ve finally started the main mixing.
As you would have noticed if you’ve seen the notes from Day 1,
it’s fair to say that 70% of the mixing is already done.
But if I were to send the rough mix tracks directly to the client,
I would undoubtedly hear, ‘What on earth did you do?’
Unless you’ve watched the mixing process from the side,
you wouldn’t understand the significance of the Day 2 rough mix.
Just as you can’t live in a house with a sturdy frame but no finishing,
it’s now time to neatly and beautifully refine the
tone and create a sense of thickness and space.
Instead of explaining every single instrument,
I’ll just explain a few important ones in the order of the mix.
1. Vocal Track Automation (Feat, Clip Gain)
If I had to single out the most important track among countless others,
it would undoubtedly be the vocal track.
You might think this is obvious, but from a mixing perspective,
the vocal track receives more special treatment than any other.
Especially in pop music, it’s no exaggeration to say that
the other tracks exist to make the vocals shine.
After spending a long time meticulously tuning vocals,
you’ve only just finished preparing the ingredients for cooking.
It’s time to print them fresh, place them on the template, and start the real ‘cutting.’
The very first thing I do when entering vocal mixing is vocal automation.
I still remember what my teacher told me when I first started learning mixing:
‘There is no mix without automation.’
Automation is such a crucial task that it can be the deciding factor
between a professional and an amateur.
Before explaining automation, there’s something I need to touch upon regarding compressors.
When listening to mixes with poor balance,
it’s often because the dynamics were adjusted using EQ and compressors.
Compressors have many potential pitfalls, and I can give two examples:
1). Loss of control due to constant tonal changes.
2). Inconsistent volume that doesn’t fit the song.
A clean way to solve these two problems is with basic automation.
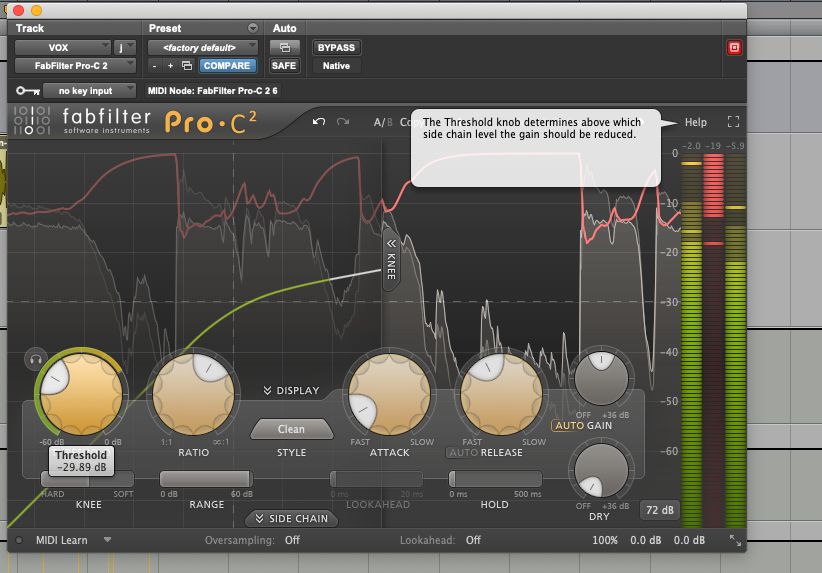
So, what exactly is automation? If you look up the dictionary definition…

At first glance, it’s a word that seems to have no connection to music,
but these days, there isn’t a person in music who doesn’t know it.
It’s a term that became common as mixing became digitized,
and it’s a technique for automatically moving faders, like the one below.
In this way, you mark the parts where you want to increase or decrease the volume in advance,
and the faders automatically move in those sections to control the volume.
In fact, it's a more manual and labor-intensive control compared to a compressor, which is why the term 'automation' can feel paradoxical.
This method allows you to specifically reduce the volume in the sections you want.
The biggest advantage is that, unlike a compressor which controls everything mechanically,
you can ‘control only the parts you want.’
This kind of manual control using automated faders is what the music industry calls automation. For example:
- Using a fader is called ‘fader automation.’
- Using clip gain is called ‘clip gain automation.’
- Using a send track is called ‘send automation.’
By using automation, you can control dynamics while preserving the original tone,
allowing for detailed adjustments to both the tone and volume.
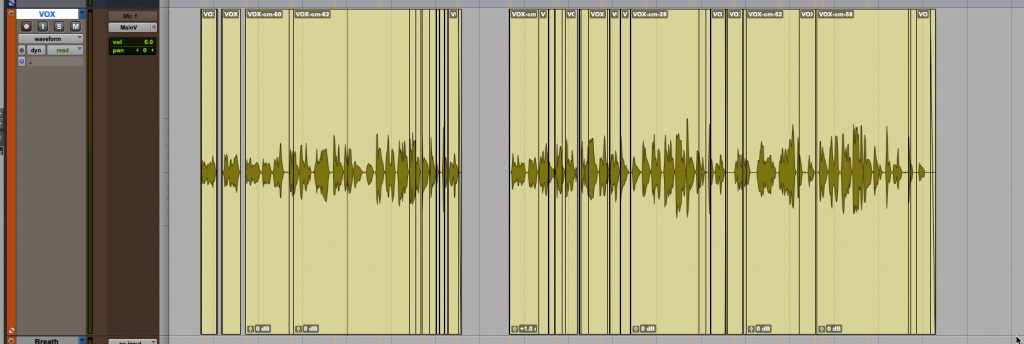
As for me, before I use any plugins,
I mainly use automation with Clip Gain.
I listen from beginning to end,
controlling the balance of even a single breath.
At this point, I also check to see if there are any elements in the
instruments that are getting in the way of the vocals or if anything is lacking.
2. Kick
In modern popular music,
the kick sound is the first gateway to determining if a song is trendy.
There are so many kinds of kick sounds that choosing
the wrong one can make a track sound outdated,
while the right one can make it sound trendy.
Anyone who has composed music before
will understand the feeling of utter helplessness
when looking at the countless kick samples for the first time.
In this song, the kick was layered using two tracks:
one with a typical sub-bass feel and one that emphasized the attack.
Because the composer had experience with a band,
they set up the kick in a way that mimicked real drum mic’ing.
I also prefer this kind of kick setup.
However, due to the nature of the kick needing to punch through the entire song,
I felt the need to reinforce it a bit more.
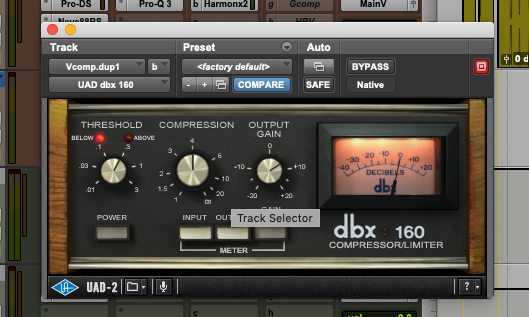
To slightly boost the sub and high-end and to create a solid,
rock-like punch, I used the Dbx160 compressor.
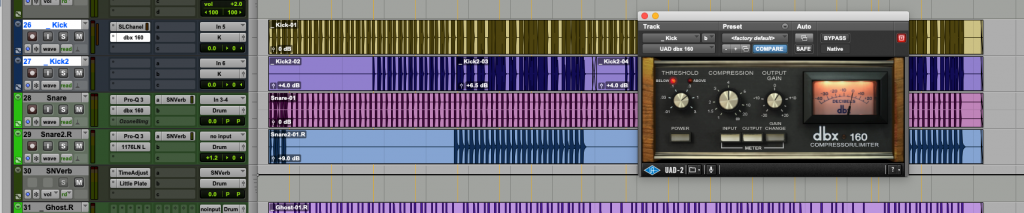
The Dbx 160 compressor is a VCA-type compressor developed by DBX in 1976.
Because it has a unique punchiness, you can use it on anything—kick drums, snares, guitars—when you want to create a feeling of the sound leaping out. However, because it has such a strong character, I personally don't use it much for simple volume control.
3. Bass
At this point, hip-hop is definitely what’s driving the music market’s trends.
Just as important as the kick in hip-hop is the bass tone.
While the guitar was the king of instruments in rock,
I feel the bass is the king in hip-hop.
Since I was quite happy with the basic source sound,
I didn’t make major changes, but instead reinforced two things:
1) A lower-lying tone.
2) A rich sustain.
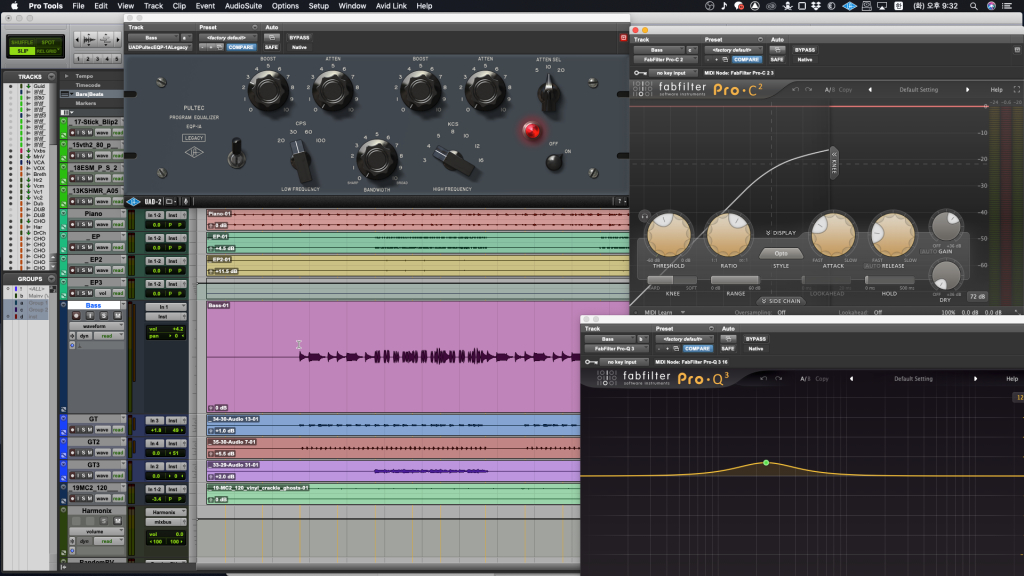
By reinforcing these two things,
I helped the bass to envelop the entire song a little more.
Finally, I used the Pro-Q3 to slightly boost the 230Hz range to add a bit more body.
4. Vocal Mixing.
I have organized all the instruments and have now moved on to the main vocal mixing.
I once saw a post that said,
‘It seems like Park Myungsoo’s vocal cords have both honey and poop.’
I remember not being able to just laugh at that comment as a
mixing engineer because it was a sentence that was so relevant to vocal mixing.
Vocal mixing is like walking a tightrope, a very fine line
between honey and poop.
It requires a lot of thought, and you’ll be able to see
my deep thought process when you look at the screenshots below.
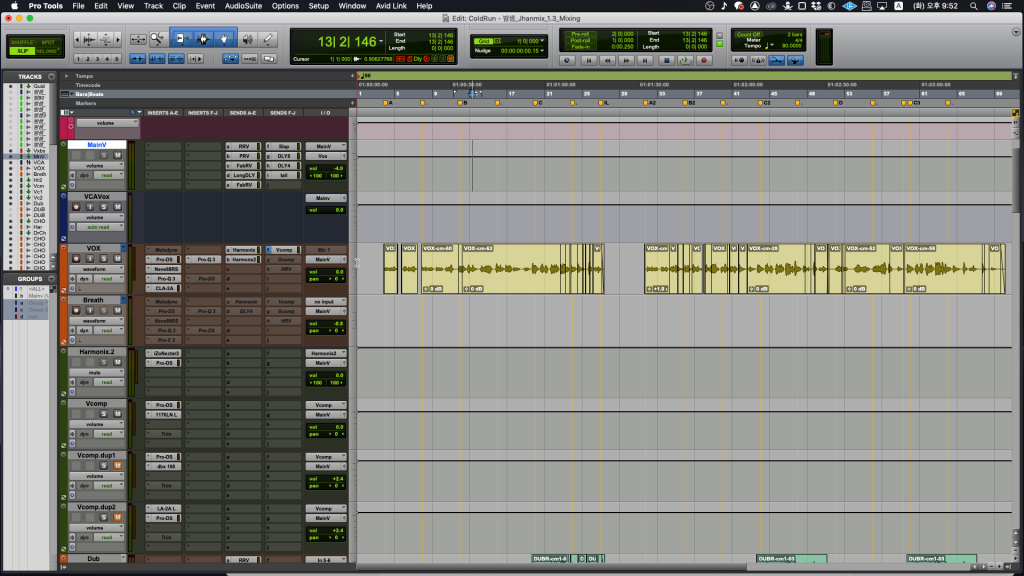
To mix a single main vocal track, I have created 9 tracks. Listing them from the top:
- Overall Vocal Bus
- Main Vocal Bus
- Vocal VCA
- Main Vocal Track
- Dedicated Breath Track
- Dedicated Vocal Harmonics Track
- 8-9 Different types of Parallel Compression
Including the dub and harmony tracks,
the total number of tracks just for the vocals is 23.
(It feels like just yesterday I was watching a Dave Pensado session and thinking,
“Why are there so many vocal tracks?”)
Of course, having a large number of tracks or
using many plugins doesn’t automatically guarantee a good sound.
However, for pop vocal mixing, a bit more processing is
often done to give the vocals a strong character.
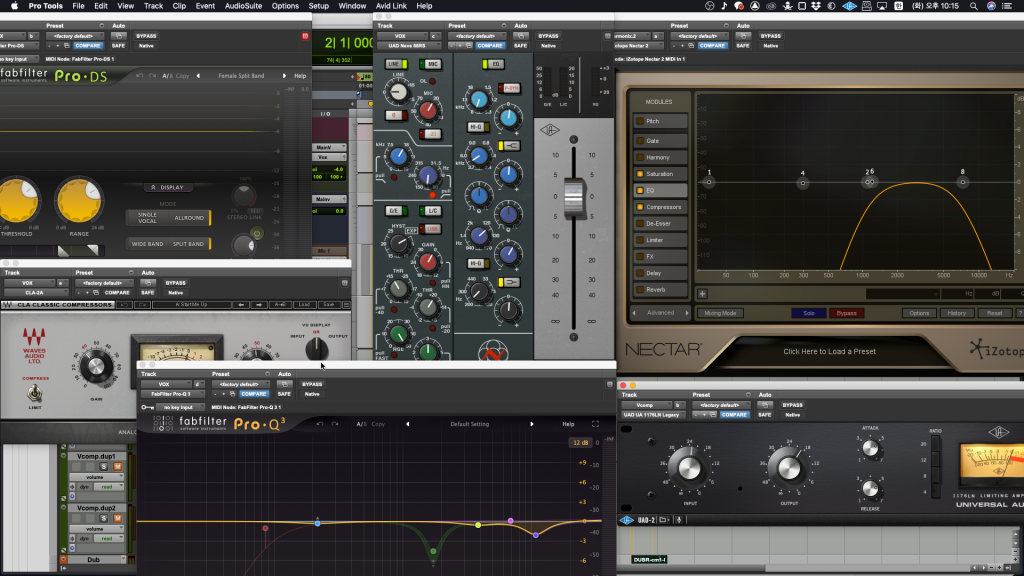
1) De-essing
I used FabFilter Pro-DS,
which I consider to be the best de-esser, to tame the sibilance.
Most de-essers function like multiband compressors,
compressing almost the entire high-frequency range.
In contrast, the Pro-DS only detects and compresses the
sibilance of a vocal, allowing for more precise de-essing.
2) EQ
As explained on Day 1,
since the recording was done with a Neumann M149 microphone,
which has a very prominent high-end,
there was no need to boost the highs further.
However, I felt the male vocal tone was a bit light,
so I boosted around 130 Hz by 3 dB to give it a little more weight.
The vocal tone was great and the recording was well done,
so I didn’t need to make many EQ adjustments.
Later, I decided it was a bit too sharp, so I slightly lowered the 11 kHz range.
3) Compressor
Currently, I think the most controversial process online is compression.
Compared to EQ, which is relatively easy to understand,
a compressor that controls ADSR is not only prone to mistakes
but also difficult to monitor its changes accurately.
In these mixing notes, I’ll focus on the purpose of
my compressor use rather than the technical aspects.
There are three things I expect to gain from using a compressor.
- Dynamic control
- Tone control based on ADSR changes
- A bit of harmonics
Usually, I first use a clean digital compressor
to make the dynamics of the pre-automated volume a bit more natural.
However, for this song, I wanted a more aggressive compression rather than a natural one.
To create a strong, trendy tone by adding powerful compression and harmonics,
I had to choose a compressor with a strong character.
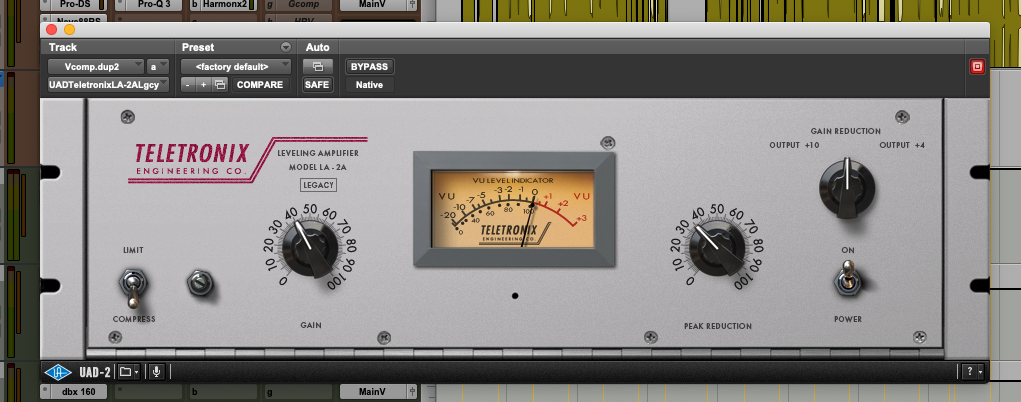
The Waves CLA-2A compressor was more than sufficient for this role,
and I boldly used it as an insert.
In fact, just with this, along with the characteristics of the tube microphone,
an incredible amount of harmonics was added.
But it still felt a little lacking.
(This shows just how many harmonic-based effects are used to process music these days.)
To add harmonics without making them sound messy,
I used the Saturation plugin within Izotope’s Nectar2,
along with Nectar2’s EQ and compressor, to add harmonics to specific parts.
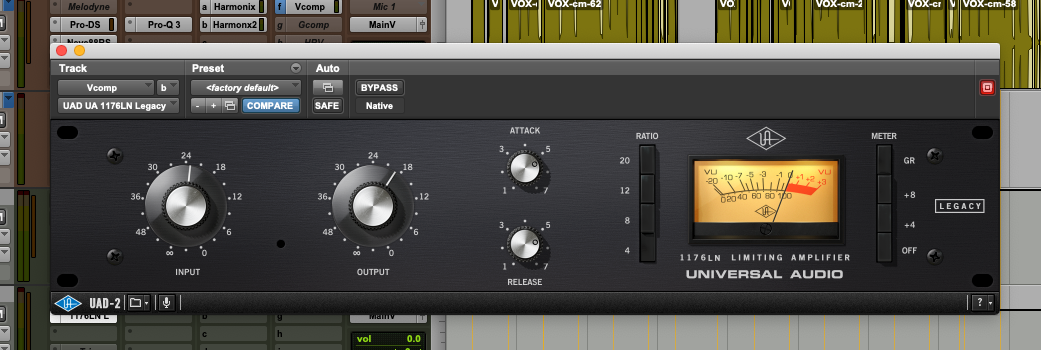
To give the vocals a feeling of being a bit closer,
I added parallel compression. After comparing three different analog-style compressors,
I decided that the 1176 was the best choice.
5. Conclusion (Feat. Technique)
With this, the overall mixing is complete.
I made a conscious effort to avoid overly technical explanations for this process,
because I believe it’s easy to get lost in technical details and lose sight of the musical elements.
Especially when communicating with a client,
you have to be careful not to just show off technical prowess, which can confuse them.
I think of mixing not as a single action that changes something with a technique,
but rather as a process of sculpting a little at a time while looking at the overall picture.
Also, when people visit an art gallery, they don’t scrutinize
‘what technique was used to sculpt this?’ but rather judge if it’s ‘good art.’
There are countless mixing techniques,
and they are a great topic for debate about what’s right or wrong.
However, I believe that any technique is valid as long as it’s used to
move toward the single goal of creating ‘good music.
